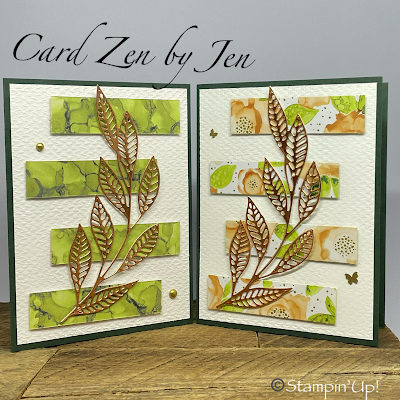
Artistically Inked - March Team Member Card


My team members will receive this card as a token of my appreciation.


This card is also part of Kylie's Blog Highlights Gallery.  I am honored to participate in this contest with such talented artists. Clicking the button will allow you to view the other cards in this contest. You can vote for a total of 5 cards- I hope you will pick my card for one of those votes. 


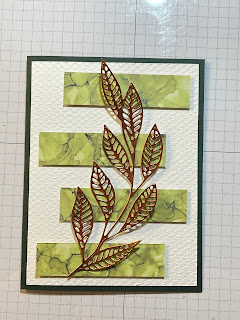
I can't believe that it took me so long to start playing with the Artistically Inked suite - the stampset, the dies and the DSP are beautiful!

I love the simplicity, versatility and beauty of this cardfront. And because the leaves are only adhered with two glue dots, they jump off the paper! My team members will love this!

~The double-sided paper allows you to choose flowers or greenery.  
~This can be used for any occasion and sentiment.

Items Needed:

Paper: Evening Evergreen, Basic White, Gold Metallic Paper, Expressions in Ink DSP

Embossing Folder and Dies: Tasteful Textile folder and Artistic dies

Embellishments: Brushed Metallic Dots or Brushed Brass Butterflies

  • Cut Evening Evergreen paper to 8½" x 5½", score at 4¼" to create cardbase.
  • Cut Basic White to 5¼" x 4" and emboss using the Tasteful Textile folder.

  • Adhere the embossed Basic White piece to the cardbase.
  • Cut 4 pieces of the DSP to ¾" x 3".  Adhere to the Basic White in a staggered style using dimensionals.  
    • Helpful hint:  Start with the top right and the lower left first so that you can space them evenly.

  • Use the long leaves die to cut the leaves from the gold paper. 
    • Helpful hint:  Run it through the embossing machine a few times, then use the brush end on your "Take you Pick" tool to remove the tiny pieces.
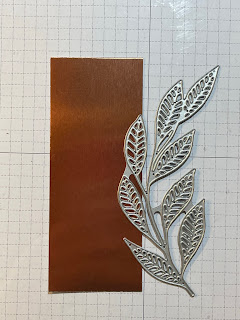
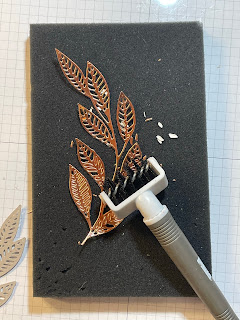


  • Add two glue dots to the back of the leaves where shown with the black dots. Adhere to the DSP.


  • Add your embellishments -dots or butterflies! 


Thanks for checking out my card.  Interested in joining my team?  Just click here to find out how.
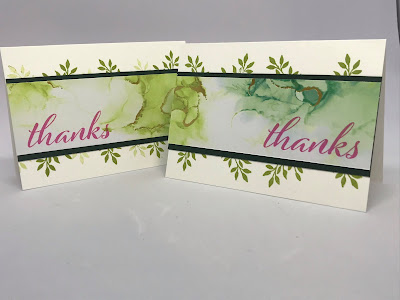
Artistically Inked - Customer Appreciation Blog Hop


This is my customer appreciation card for February!
When placing your order, use my current host code located on the right of my blog.  
You will get this card from me! 

This blog is part of a demonstrator training blog hop.  When you are done taking a look at my blog, hop on to the next blog from the list below.  That blog will have the same list at the bottom, and you will just hop on along to the next blog on the list.  That is so much better than googling the night away!!  All this talent in one quick and easy list! 


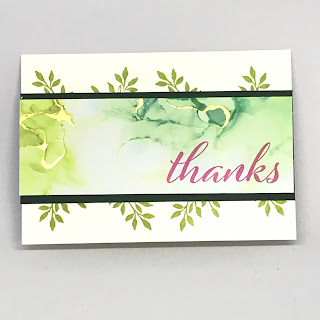
For this month's customer appreciation card, I'm using the notecards from Stampin' Up! They are the perfect backdrop to make any thank you card! To that, I added the Artistically Inked stampset, the  Friendly Hello stampset (free during sale-a-bration) and the Expressions in Ink DSP.   

  • Start by stamping the leaves in Pear Pizzazz. You can stamp off to add lighter pieces.
  • Cut the DSP to 1¾" x 5".  Adhere it to a piece of Evening Evergreen, cut to 2" x 5".
  • Stamp the "Thanks" in Polished Pink.  (I absolutely love Polished Pink and Pear Pizzazz together- and I am not the pink kind-a girl!!!)
Voila!!!  What a beautiful card to give to those who deserve your appreciation....like my treasured customers.

Don't forget to place your order using my host code AND earn FREE product during Sale-A-Bration (ends 2/28/2022).

CLICK HERE TO SHOP WITH MY HOST CODE NOW

Oh, and hop along to see my friends cards!! 


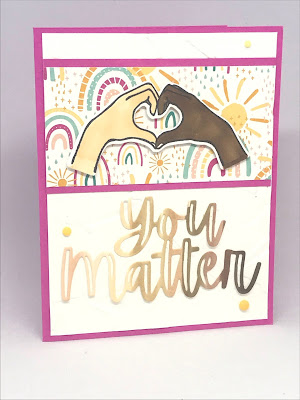
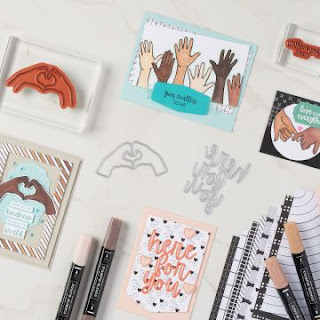
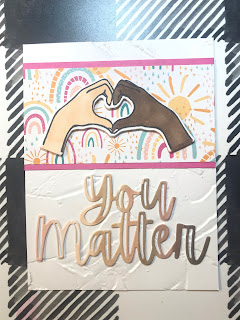
You Matter ~ All Together Stampin' Up!


This card was created using the All Together Collection that is offered
 for a limited time or while supplies last. Find the shopping links
 for this collection below.


All Together Collection- Click here to shop now.


The All Together Collection includes:

HERE TOGETHER STAMP SET (10% OFF)
* 9 cling stamps
HERE FOR YOU DIES (10% OFF)
* 5 dies
ALL TOGETHER 6" X 6" (15.2 X 15.2 CM) DESIGNER SERIES PAPER
* 48 sheets of patterned paper: 4 each of 12 double-sided designs
NATURAL TONES STAMPIN’ BLENDS COLLECTION
* 10 blend markers

All of that for just $105 - AND if you buy before 2/28, you will earn Sale-A-Bration free product too!

Let's make this card together.

  • Cut the cardbase using Magenta Madness cardstock-  8½" x 5½", score at 4¼"
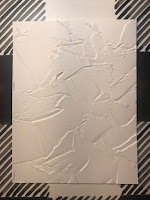
  • Cut Basic White to 4" x 5¼", then emboss it using the Painted Texture 3D embossing folder.


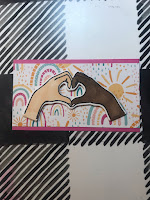
  • Cut the DSP (Sunshine and Rainbows- free Sale-a-bration product) to 2" x 4".
  • Cut Magenta Madness to 2¼" x 4". 
  • Adhere the DSP to the Magenta Madness.
  • Stamp the hands with Memento Black onto Basic White. Cut out using the coordinating die. 
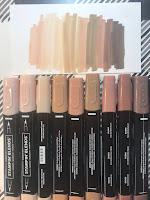
  • Color the hands using the Natural Tones Stampin' Blends. 
  • Adhere the hands to the DSP using dimensionals.

  • Use the Natural Tones Stampin' Blends to color on Basic White cardstock, blending them light to dark.

  • Use the die "You Matter" to cut from the blended cardstock.
  • Adhere it to the lower half of your cardbase.

  • Adhere your panel to your cardbase and you are done..... we did it, together.
Hope you enjoyed learning a new technique and playing with the All Together collection. 
Be sure to get the collection before it is gone! And you don't want to miss out of free product with Sale-a-bration!!  

February Team Member Appreciation Card

My team members get this card and
the written tutorial for FREE!


Are you getting tired of looking at snow?? Me too.  It's time to break into the Flowering Rain Boots bundle and make some of my favorite flowers- red gerbera daisies!!!

Join my team in February and you will get this card plus the written tutorial so that you can make it yourself!! 

This is also my submission to the International Blog Highlights. You know, THE Kylie Bertucci's International Blog Highlights Gallery???  My husband keeps calling her Kylie Bertinelli- I think he has a thing for Valerie Bertinelli.  No worries, I would be happy to be either one of them. 

No, I have not won yet but I am getting very close and quite honestly, the journey is it's own reward. Oh, who am I kidding with that crap so please, if you like my card, will you click on the button below and vote for me??


Enough of the groveling, back to how you can get this tutorial!!

There are some more reasons to join my team in February... Sale-a-bration is on until 2/28/2022 and you get to choose an additional TWO stampsets - FOR FREE!!!    (one of my favorite F words!!!!)


I really love this card and can't wait to share the tutorial with you!!!  Click JOIN NOW to get to the registration site.  Many join has hobby demonstrators so that they can enjoy the discounts- I am totally on board with that and you will never be forced to sell.

E-mail me at cardzenbyjen@yahoo.com with any questions or concerns.  


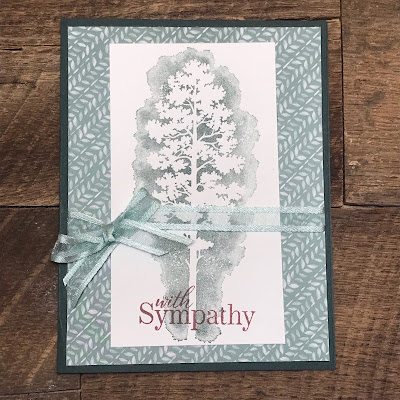
Amazing Silhouettes ~ Sympathy Card


It seems like deaths occur more in the winter months than any other time.  I am sure that is statistically wrong, but it sure does feel that way.  Unfortunately, we never seem to have as many sympathy cards as we need.  My thought is that if you must send a sympathy card, make it beautiful so that the love can be felt.

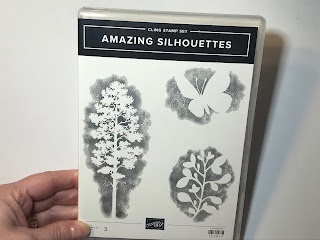
The Amazing Silhouettes stampset is so simple, with just three stamps, yet it makes such beautiful bases for any sentiment- birthday, congratulations, or yes, sympathy.


Let me show you how easy it is to make this card.... then you can even change it up with different colors, paper or even step it up with heat embossing.

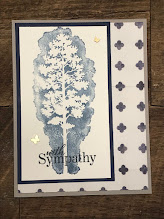
  • Cardbase: Cut your Evening Evergreen cardstock to 8½" x 5½", score at 4¼".
  • Cut your DSP (designer series paper) from the Ever Eden paper to 4" x 5¼".  
  • Cut your Basic White cardstock to 2¾" x 4¾".
  • Stamp the large tree centered on the white cardstock using Evening Evergreen. (For this you will need to use a large block and apply the ink to the stamp as shown in the photo.)

  • Then stamp the sentiment at the base of the tree in Merry Merlot. (The sentiment is from the "Special Moments" stampset that you can get free with a $100 purchase during SALE-a-bration.)
  • Adhere the stamped piece to the DSP.
  • Wrap the Open Weave Soft Succulent ribbon around them and tie in a bow, secure with glue dots.
  • Adhere the panel to the front of your cardbase. 
Follow this link to find everything you need to make this card. While creating this list, I noticed that the DSP Ever Eden is no longer available. If you drop me a message, I am happy to send you a panel as long as my supply lasts.  But you can also use any other DSP that you have.  
 SHOP NOW - Remember that if you purchase $100 before 2/28/2022, you can get the "Special Moments" stampset for FREE!! 
Special Moments


Here are some other variations:


Easter Friends - Betty White Week


The directions for this Double Z Fold card are below.


In honor of Betty White, I will be donating 10% of all sales from 1/16/2022 to 1/23/2022 to our locate non-profit SPCA. The cards shown this week will feature some of the adorable animals that she loved so much!  

Things to know:

  • Order between 1/16-1/23/2022  and I will give 10% to local animal rescue.
  • If you order $50 of product or more, you will qualify for free product from the SALE-a-bration brochure. (the pdf version can be found on the right side of my blog)
  • Use my host code STNCDV6K  and you also get the current customer appreciation card!
  • Click here to shop with the current host code now!

As part of my Betty White Week, I am featuring another card and stampset that shows the adorable critters that Betty loved so much.  The Easter Friends stampset from Stampin' Up!® has the cutest lop eared bunny, a playful duckling and a baby chick as well as several great phrases and greetings in a hand-written font. This set is in the Jan-June 2022 catalog while supplies last, so don't miss out!


Directions:
  • Cut cardbase (Mango Melody) to 4¼" x 11".  Then score it at 5½" and 8¼".
  • Cut Basic Black cardstock to 3¼" x 10". Then score it at 4½" and 7¼".
  • Cut Basic White cardstock for panels.  Cut two at 3" x 2½" and one at 3" x 4¼".
  • Cut DSP (Magenta Madness from 2020-2022 in colors). Cut two pieces to ½" x 2½" and one at ½" x 4¼". 
  • Line up the DSP to the side of your panels but don't adhere it yet.  This gives you a visual of where to stamp the images along the right side of the panels so that your images don't get covered up.
  • Stamp the bunny on the tallest panel in Crumbcake. Stamp sentiment in Memento Black. 
  • Stamp the duckling in Crushed Curry and the grass in Garden Green on one of the smaller panels.
  • Stamp the baby chick in Pumpkin Pie  and the phrase in Memento Black on the last small panel.
  • Adhere the DSP to the left side of you panels.
  • Adhere the panels to their corresponding size on the Basic Black cardstock that you already scored.
  • Lay the Mango Melody piece flat then center the Basic Black piece. Add adhesive to the TOP of the Basic Black and to the BOTTOM of the Basic Black piece.  (see photo above)
  • Add embellishments (basic rhinestones.)
Need help??  I am only an e-mail or text message away!!! 

Now that you have the basic recipe for the Double Z fold card, change it up!!!!  You can fill your panels with puffins, dogs and cats, chickens, butterflies.... the possibilities are endless.  I would love to see what you do with this!!

Friendly Hello - Betty White Week


Find the directions below.


 In honor of Betty White, I will be donating 10% of all sales from 1/16/2022 to 1/23/2022 to our locate non-profit SPCA. The cards shown this week will feature some of the adorable animals that she loved so much!  

Things to know:

  • Order between 1/16-1/23/2022  and I will give 10% to local animal rescue.
  • If you order $50 of product or more, you will qualify for free product from the SALE-a-bration brochure. (the pdf version can be found on the right side of my blog)
  • Use my host code STNCDV6K  and you also get the current customer appreciation card!
  • Click here to shop with the current host code now!

The Friendly Hello stampset and DSP (designer series paper) from Stampin' Up!'s SALE-a-bration brochure are free with a $100 purchase. Yes, you get the stampset AND the paper.... FREE! 


Let's make this card together.

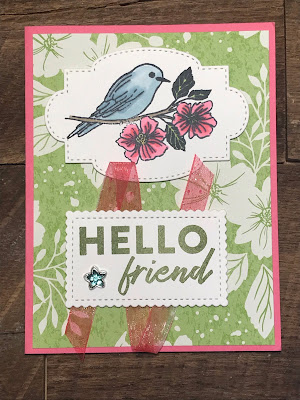
  • Cut Polished Pink to be the cardbase. (cut to 5½" x 8½", scored at 4¼")
  • Cut the DSP panel to 4" x 5¼" and adhere to the front of the cardbase.
  • Stamp the bird/flowers on Basic White using Momento Black.
  • Color the bird/flowers using Stampin' Blends - Balmy Blue, Granny Apple Green, Polished Pink and Crumbcake.
  • Cut out bird/flowers using die from Stitched So Sweetly and adhere to top half of card using dimensionals.
  • Stamp "hello friend" on Basic White using Old Olive ink.  
  • Cut out sentiment using the die from Stitched So Sweetly.
  • Cut your Glittered Organdy Ribbon and color it with the Polished Pink Stampin' Blend!!!!!  Yes, you can do that!!!
  • Use dimensionals to adhere the ribbon to the back of the rectangle, then adhere to the lower half of the cardbase.
  • Add an embellishment to cover the dot of ink that somehow appeared on your sentiment piece.   Yep, we all need embellishments. 😏
So that's it. I told you it was easy. Would I lie to you??  

Come back tomorrow for another card featuring the animals that Betty White loved so much.  In the meantime, I need to show my pup, Xena, some attention.   
Do you think she wants something??


In the Moment - Betty White Week


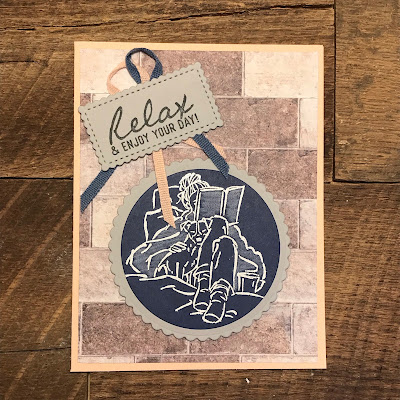
The snuggling dog in this stamp makes me want to
 cozy up with my pup and a good book!


In honor of Betty White, I will be donating 10% of all sales from 1/16/2022 to 1/23/2022 to our locate non-profit SPCA. The cards shown this week will feature some of the adorable animals that she loved so much!  

Things to know:

  • Order between 1/16-1/23/2022  and I will give 10% to local animal rescue.
  • If you order $50 of product or more, you will qualify for free product from the SALE-a-bration brochure. (the pdf version can be found on the right side of my blog)
  • Use my host code STNCDV6K  and you also get the current customer appreciation card!
  • Click here to shop with the current host code now!


The stampset "In the Moment" has some beautiful scenes that inspire relaxation and self-care.  This particular stamp with the snuggling dog it a favorite. Let me show you how easy it is to make this card!

  • Cut the DSP from the  "In Good Taste" paper to 4" x 5¼". Adhere the panel to the Petal Pink cardbase.
  • Stamp the scene in versamark on Night of Navy and heat emboss with white embossing powder.  Then color in the blanket and book with the white water-color pencil. 
  • Cut the circle using "Layering Circles" dies.  Cut the larger scalloped edge circle out of Gray Granite.
  • Adhere the layered circles to the lower portion of the card using dimensionals.
  • Stamp the sentiment in Momento Black on Gray Granite and cut using the "Stitched So Sweetly" die.
  • Add the Petal Pink and Misty Moonlight ribbon and place the tag over it using dimensionals.  
There you go!! You did it.  It is so easy to create that white-washed effect.  Try it on some different stamped scenes.
Don't forget to place your order using the link above!!!

Sentimental Swirls - Floral Card


I saved the best for last!!

Welcome back to the Sentimental Swirls series!


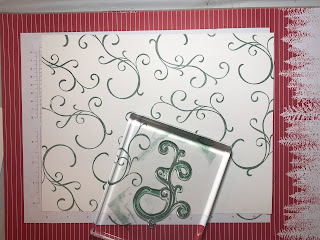
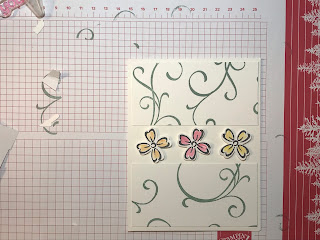
This week we have been making four different cards from one sheet of stamped swirls.

We stamped an entire 8½" x 11" Basic White cardstock with the swirl using Soft Succulent.

Then, we cut that sheet into four pieces measuring 4" x 5¼".  We used one of those panels to make the "thank you", "hello" and "happy birthday" cards. 

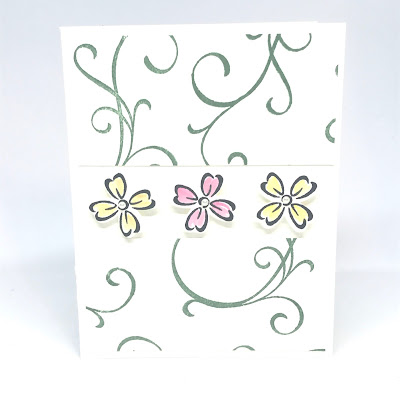
Today, let's make the floral card! I am so excited to share this with you.  It can be used for any occasion- birthday, wedding, sympathy, or to just brighten someone's day.

This stampset is so simplistically beautiful!!!  The possibilities are endless.  Thanks again to Sam Hammond for designing such a great set!

Sentimental Swirls
Buy it now!


Items Needed:

Sentimental Swirls stampset
Basic White cardstock (8½" x 11")
Thick Basic White cardstock (cut to 8½" x 5½", scored at 4¼")
Memento Black Ink
Crushed Curry Ink
Polished Pink Ink
Pumpkin Pie Ink
Pearl Basic Jewels
Dimensionals

All items have been added to a shopping list for your convenience.
Click here to shop the list- don't worry, you can remove any items you already have.

Instructions:

  • Stamp the large swirl in Soft Succulent ink over the Basic White cardstock. Make sure to not crowd it.
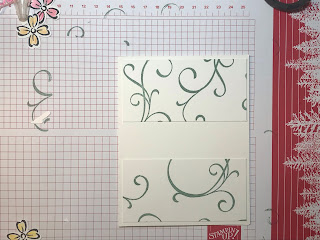
  • Cut the sheet into 4 pieces, each 5¼" x 4".
  • Cut the panel into two pieces, each piece being 2" x 4".
  • Adhere the pieces to the top and bottom of the front of the cardbase.

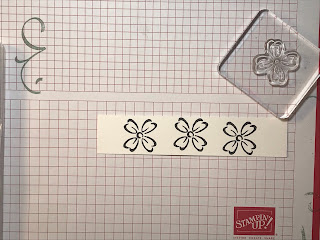
  • Stamp three flowers in Memento on Basic White cardstock.


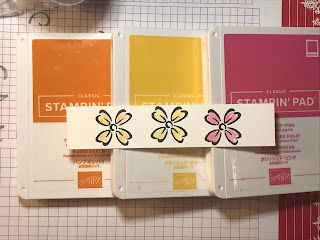
  • Color the flowers using your Wink of Stella like a paint brush dipped in a bit of ink.  I used Crushed Curry, Polished Pink and Pumpkin Pie.
  • Fussy cut the flowers.  
  • Add the flowers to the center of the card using dimensionals.


  • Add the pearls to the center of the flowers.
That's it!!  You did it!  You really can knock out all four cards in an hour!!!  I hope you had fun.  I know I did.  
Be sure to come back next week.  I will feature another new stampset from the new mini catalog!