Showing posts with label paper crafts. Show all posts

Easter Friends - Betty White Week


The directions for this Double Z Fold card are below.


In honor of Betty White, I will be donating 10% of all sales from 1/16/2022 to 1/23/2022 to our locate non-profit SPCA. The cards shown this week will feature some of the adorable animals that she loved so much!  

Things to know:

  • Order between 1/16-1/23/2022  and I will give 10% to local animal rescue.
  • If you order $50 of product or more, you will qualify for free product from the SALE-a-bration brochure. (the pdf version can be found on the right side of my blog)
  • Use my host code STNCDV6K  and you also get the current customer appreciation card!
  • Click here to shop with the current host code now!

As part of my Betty White Week, I am featuring another card and stampset that shows the adorable critters that Betty loved so much.  The Easter Friends stampset from Stampin' Up!® has the cutest lop eared bunny, a playful duckling and a baby chick as well as several great phrases and greetings in a hand-written font. This set is in the Jan-June 2022 catalog while supplies last, so don't miss out!


Directions:
  • Cut cardbase (Mango Melody) to 4¼" x 11".  Then score it at 5½" and 8¼".
  • Cut Basic Black cardstock to 3¼" x 10". Then score it at 4½" and 7¼".
  • Cut Basic White cardstock for panels.  Cut two at 3" x 2½" and one at 3" x 4¼".
  • Cut DSP (Magenta Madness from 2020-2022 in colors). Cut two pieces to ½" x 2½" and one at ½" x ". 
  • Line up the DSP to the side of your panels but don't adhere it yet.  This gives you a visual of where to stamp the images along the right side of the panels so that your images don't get covered up.
  • Stamp the bunny on the tallest panel in Crumbcake. Stamp sentiment in Memento Black. 
  • Stamp the duckling in Crushed Curry and the grass in Garden Green on one of the smaller panels.
  • Stamp the baby chick in Pumpkin Pie  and the phrase in Memento Black on the last small panel.
  • Adhere the DSP to the left side of you panels.
  • Adhere the panels to their corresponding size on the Basic Black cardstock that you already scored.
  • Lay the Mango Melody piece flat then center the Basic Black piece. Add adhesive to the TOP of the Basic Black and to the BOTTOM of the Basic Black piece.  (see photo above)
  • Add embellishments (basic rhinestones.)
Need help??  I am only an e-mail or text message away!!! 

Now that you have the basic recipe for the Double Z fold card, change it up!!!!  You can fill your panels with puffins, dogs and cats, chickens, butterflies.... the possibilities are endless.  I would love to see what you do with this!!

Quick Tip Tuesday - Preparing to Stamp


So, you bought a Stampin' Up!™ stampset but when you opened the case, they don't look the same as the ones you used in class or saw online.  And there are really no directions in how to prepare them or what to do next.  The idea behind the "no directions" is that you would get instruction from your friendly Stampin' Up!® demonstrator.  But what if you bought retired stamps online??  Do you have a demonstrator?  If not, I am happy for the opportunity to help you on your stamping journey.  So, let's get those stamps ready to use!  

Let me show you the different types of stamps offered, how to prepare them, and how to get the best results. 


In the video, I showed how to use the photopolymer (clear) stamps with the mat.  I couldn't remember the name at the time (old age is setting in).  It is the Stampin' Pierce Mat and you can order it by clicking on the photo.  It is just $5 but makes all the difference when using the clear stamps.


Don't forget to get your shammy to wipe your stamps off in between uses.  I call it the "squishy, squishy"!  It is just $8. You can order by clicking on the photo.


Catch you next Tuesday for Quick Tip #3!  

Do you want a quick tip on a specific topic?? I am happy to take requests!

Tombstone Treats - get more for your money!!


These treat boxes are so easy to use, just as they come. There are 8 whole tombstones for just $10 when you put them together like this. One tombstone piece is on the top and one serves as the bottom for a total of 16 pieces, but 8 treat boxes.


But, I found a way to get 16 tombstones instead of just 8.  By creating your own bottom box you could make more treat boxes.  Here is how I did it.

Before we get started, take notice that the tombstones are in two different sizes (an eighth of an inch difference) to allow them to fit together. So that my black bottom boxes would fit, I needed to create two different sizes... Don't worry, I did all the math for you.😉

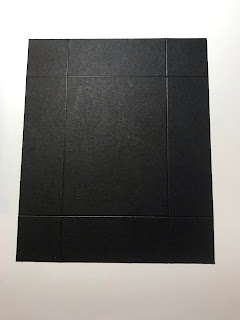
Cut 8 pieces of black cardstock to 5¾" x 4¾" (small size).

Cut 8 pieces of black cardstock to 5⅞" x 4⅞"(large size).

Score all pieces at 1⅛" the whole way around.


Now snip in to the crossing lines on the short sides only- so that it looks like this.


Use your bone folder to make sharp creases at your score lines.  Now add adhesive using your Stampin' Seal + only in the spots as shown below.  Adhere it to form a box shape.


So there it is.... you can stop there and put your tombstone top on.... but what fun would that be???  Let's add a window to the tombstone top!!

You must do this BEFORE you remove the adhesive strips (already on the tombstones) and create your top box.  If you already put all yours together???  Just order more from me! The link will be at the bottom.  You're welcome.

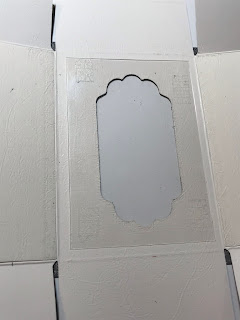
Take your still flat tombstone.  I used the smaller label die from the Seasonal Label Dies (2021 Jul-Dec catalog). **Make sure that you have the label die down below the top crease of the box. Follow the imaginary line from the crease in the flap. Be below that line!! It was too high in this photo.


          Did you see in the photo above that I was not below the crease???? Do as I say, not as I do.

Oh well, we go on.

Cut window sheet to 2¼" x 3¼".  Adhere to the inside of your tombstone.


Now remove the 3m strips that Stampin' Up! so conveniently provided and fold it up!


Now is the best part, decorate it!  I used everything from leftover Paper Pumpkin pieces from 2020 to skeleton stamps from Paper Pumpkin in 2019. Don't forget that adorable gingham black and white ribbon (2021 Jul-Dec catalog).  Did you know that you can color that ribbon with your Stampin' Blends.  Again, you're welcome.

Oops, almost forgot.  Don't throw away the piece you cut out with the label die.  If you cut it in half and add some black ink around it with a blending brush, it makes a great tombstone for decorating.

Let's get you hooked up with everything you need to make these adorable boxes.  Just think, if you can get 16 treat boxes out of it instead of 8, you can treat more co-workers, family members and neighborhood kids for just $10.

Click here to shop with me for the basics needed to make these spooktacular treat boxes!