This blog is part of a demonstrator training blog hop. When you are done taking a look at my blog, hop on to the next blog from the list below. That blog will have the same list at the bottom, and you will just hop on along to the next blog on the list. That is so much better than googling the night away!! All this talent in one quick and easy list!
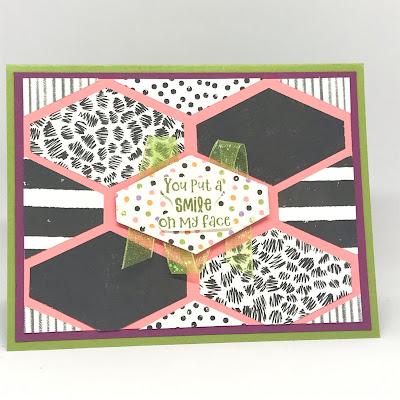
Welcome to Card Zen by Jen! This is my December/January Customer Appreciation card. What does that mean?? Place an order using my current host code, 3W9J72PD, and you will get this card mailed to you for your personal use. Tried something a bit different for this card.... I used the B sides. I have always been a lover of the B sides. It all started with Queen's "Another One Bites the Dust." Can you believe it was on the B side?? Never underestimate them.
So, here we are in December... about to close out the June-Dec catalog and I have loads of the Cute Halloween paper left as well as the Cutest Halloween stampset. Oh what is a girl to do??? Let's use some B sides.
Here are the A sides and B sides of this paper and the stampset. At a glance, it seems like you can only use this for Halloween, but let's think outside the box a little.
Using the Taylored Tag, I cut the shapes from the B sides.
Cut Flirty Flamingo cardstock to 3¾" x 5".
I started with the paper using the colored dots in the center and added the black and white shapes around it. Your shapes will go off the cardstock.
*** I put the center image down with TEMPORARY ADHESIVE while I worked out my design. I then adhered the black and white shapes with permanent adhesive. Don't permanently adhere the colored center shape just yet.
Turn it over and cut around the cardstock.
Center it onto Rich Razzleberry cardstock measuring 4" x 5¼".
Did you know that we have Granny Green glittered organdy ribbon?? Well, we actually have white, but all you have to do is color it with a Stampin' Blend. You can do this will all the white ribbons that Stampin' Up! sells. (Talk about the ultimate B side!)
So, you guessed it, color your ribbon!!!
Remove the center shape from your card, add some dimensionsals and wrap your ribbon behind it.
Stamp the "You put a smile on my face" in Old Olive on Basic White cardstock. Fussy cut it out. Add it to the center of your center shape using a dimensional.
Adhere it to Old Olive cardstock (Gray Granite works well also.)
I hope that this really does put a smile on your face. Take a look around your current supplies and see if they don't have some B sides that are still useful.
Don't forget to place your order using my current host code to get this card for free!


