Quick Tip Tuesday - Make your Clear Stamps Sticky Again

It happens.  You have favorite stamps that get more use than others.  Or maybe you had them too close to your embossing buddy or powders.  It happens.  They lose their stickiness.  Now you go to put them on the block and they fall off---- usually after you have ink on it and it falls right onto your project. 

My life motto is " You can either curse the darkness, or light a candle." 

After much cursing, I searched for a solution.

In most cases, your Stampin' Up!® demonstrator will be able to guide you to a solution.  If you don't have one, I am happy for the opportunity to help you on your stamping journey.  So, let's make some stamps sticky again!??


Join me next Tuesday for another episode of Quick Tip Tuesday!!

November's Customer Appreciation Card


Use current host code 3W9J72PD and get this card free!

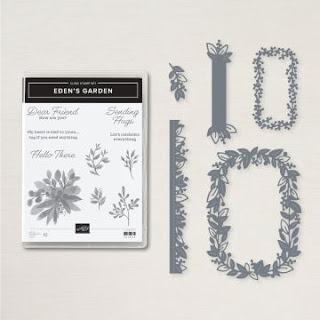
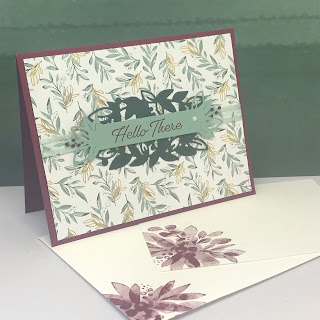
Welcome to Card Zen by Jen!  This is my November Customer Appreciation card.  What does that mean??  Place an order using my current host code, 3W9J72PD, and you will get this card mailed to you for your personal use.  Not only that, but I will also send you the written tutorial and access to the video tutorial so that you can make your own!!  We'll talk more about this exclusive stampset, Eden's Garden, in a second. But first...


This blog is part of a demonstrator training blog hop.  When you are done taking a look at my blog, hop on to the next blog from the list below.  That blog will have the same list at the bottom, and you will just hop on along to the next on the list.  That is so much better than googling the night away!!  All this talent in one quick and easy list! 


Back to the card!!!!!  As a demonstrator, we have exclusive early access to stampsets from future catalogs.  This totally satisfies my FOMO personality!  You can't see the catalog yet, but you can now order this set!  Let's take a quick peek!

Eden's Garden Bundle - Early release from the June-July 2022 Catalog

The sentiments in this set are so "real" and would be well-received. The images are distinktive stamps.  What does that mean?  They pick up the ink at varying rates to create lighter and darker images in one stamp.  This effect can be seen in the picture of the inside of my card below.


Ever Eden DSP  12 x 12
ONLY AVAILABLE UNTIL 1/3/2022 OR WHILE SUPPLIES LAST!!

This paper highlights two of the 2021-2023 In-colors, Soft Succulent and Evening Evergreen.  This photo doesn't adequately show the pops of gold foil.  This paper truly is the star of the Eden's Garden show!  I am sad to say that this paper is not in the upcoming catalog.  It is only available until 1/3/2022 or while supplies last.  It has been very popular so far so don't wait!

Again, I have a FOMO personality, so if you want to cover your bases, just order the collection and get it all!  You won't regret it!

EDEN’S GARDEN COLLECTION 

The entire exclusive, early-release collection can be yours! 

In all honesty, I loved the colors, but this set was not one of my favorites.  But once I put stamp to ink, I was hooked.  It's versatility makes it useful for Christmas, masculine or feminine projects.  

Don't forget to use my host code G2T6X42X so that you can get this card and the tutorial!


Now hop on along to the next talented, brave, and beautiful Stampin' Up!® demonstrator's blog!


Quick Tip Tuesday - Adhesives - A Sticky Situation?


So, you started dipping your toe into the papercrafting pool. The directions in the tutorial say "adhere" but what does that mean??? What do you use? There are so many choices! 

In most cases, your Stampin' Up!® demonstrator will help you navigate this sticky situation. If you don't have one, I am happy for the opportunity to help you on your stamping journey.  So, let's explore some sticky stuff, shall we??


Join me next Tuesday for another episode of Quick Tip Tuesday!!

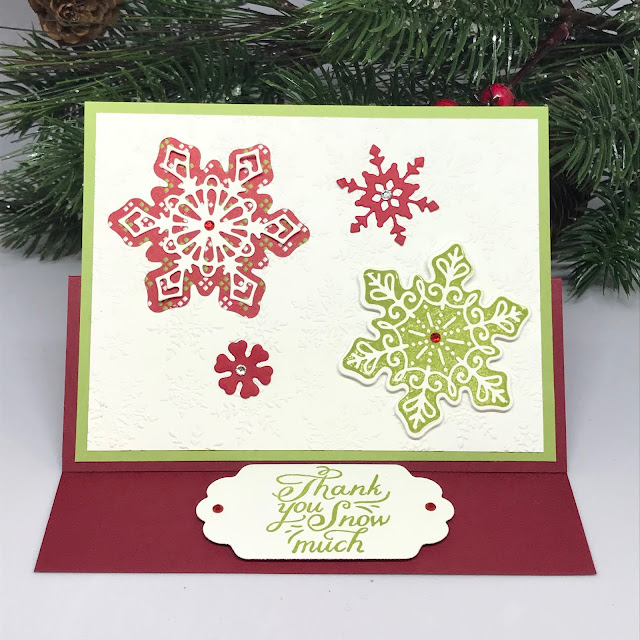
Frosted Gingerbread or Snowflakes?


Do you want to make this card? See how to get the packet below!


This card is part of an International Blog AND my November card packet to my team members.  

If you like my card, please follow this link to place your vote (for me, pretty please). If I finish in the top 10, then I get to participate in a special blog hop with the other finalists!
The Frosted Gingerbread stampset is getting a workout in my Craft Cave.  This card uses the dies and stamps at snowflakes instead of cookies.  Snowflakes don't taste as good as cookies, but do have less calories.  


Get the card packet, pdf tutorial, and a bundle for FREE!
My team members are getting this card packet and the pdf tutorial for free in November.  
Stampin' Up!® is having an unbelievable promotion to join from 11/4-11/30/2021.  

Join my Stampin' Up!® team before 11/30/2021 and get all of this:
  • Pick $125 worth of Stampin' Up!® product and you will pay just $75  (marked down from the standard $99)- and no shipping cost on this order! And YOU get to choose what you get!!!
  • Enjoy a discount of at least 20% for as long as you are a demonstrator.
  • Join an amazing community of stampers that share ideas and support each other. 
  • While you have the opportunity to sell Stampin' Up!® and earn extra product, income and trips, many join for the discount and become "hobby" demonstrators.  There is nothing wrong with that!!! Take advantage of this promotion while it lasts!!!  (ends 11/30/2021)
  • Oh, and you will also get my card packet and the pdf tutorial.... seems so little after all the other goodies, right?
CLICK HERE TO JOIN

If you have any questions about joining, feel free to email me at cardzenbyjen@yahoo.com or call me! I'd love to chat!

Quick Tip Tuesday - Preparing to Stamp


So, you bought a Stampin' Up!™ stampset but when you opened the case, they don't look the same as the ones you used in class or saw online.  And there are really no directions in how to prepare them or what to do next.  The idea behind the "no directions" is that you would get instruction from your friendly Stampin' Up!® demonstrator.  But what if you bought retired stamps online??  Do you have a demonstrator?  If not, I am happy for the opportunity to help you on your stamping journey.  So, let's get those stamps ready to use!  

Let me show you the different types of stamps offered, how to prepare them, and how to get the best results. 


In the video, I showed how to use the photopolymer (clear) stamps with the mat.  I couldn't remember the name at the time (old age is setting in).  It is the Stampin' Pierce Mat and you can order it by clicking on the photo.  It is just $5 but makes all the difference when using the clear stamps.


Don't forget to get your shammy to wipe your stamps off in between uses.  I call it the "squishy, squishy"!  It is just $8. You can order by clicking on the photo.


Catch you next Tuesday for Quick Tip #3!  

Do you want a quick tip on a specific topic?? I am happy to take requests!

Quick Tip Tuesday - Die Storage

 As a beginner stamper, I was so excited to open my first die set from Stampin' Up!® and start cutting out my stamped images with my embossing machine.  

But I was frustrated when it was time to put them away.  The metals dies would not stick back on the white cardstock that they came on.  The idea of letting them lose in the plastic envelope made me cringe!!!

Several experienced stampers told me where I could buy magnetic boards, but they were expensive....and I was just starting out. 

Watch this quick video for my inexpensive and easy way to keep my dies tidy and have more money for stamping!


Come back every Tuesday for another Quick Tip for beginner (or not) stampers!

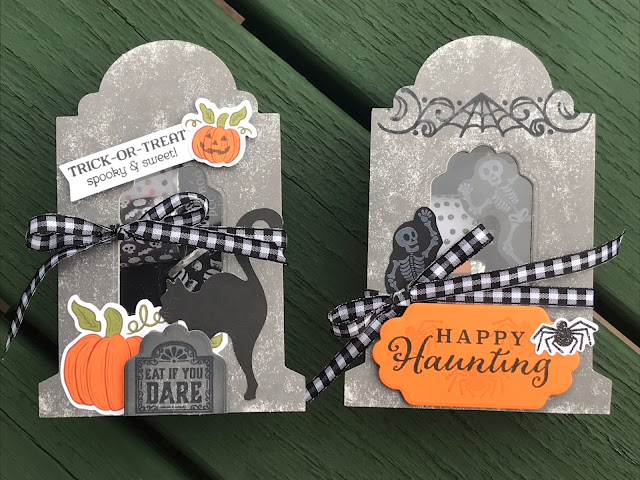
Tombstone Treats - get more for your money!!


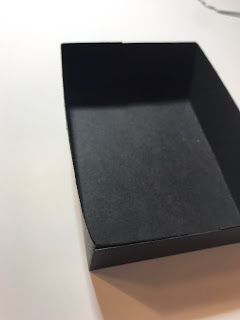
These treat boxes are so easy to use, just as they come. There are 8 whole tombstones for just $10 when you put them together like this. One tombstone piece is on the top and one serves as the bottom for a total of 16 pieces, but 8 treat boxes.


But, I found a way to get 16 tombstones instead of just 8.  By creating your own bottom box you could make more treat boxes.  Here is how I did it.

Before we get started, take notice that the tombstones are in two different sizes (an eighth of an inch difference) to allow them to fit together. So that my black bottom boxes would fit, I needed to create two different sizes... Don't worry, I did all the math for you.😉

Cut 8 pieces of black cardstock to 5¾" x 4¾" (small size).

Cut 8 pieces of black cardstock to 5⅞" x 4⅞"(large size).

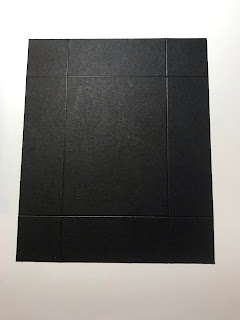
Score all pieces at 1⅛" the whole way around.


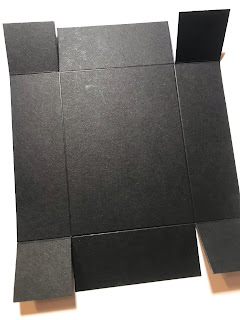
Now snip in to the crossing lines on the short sides only- so that it looks like this.


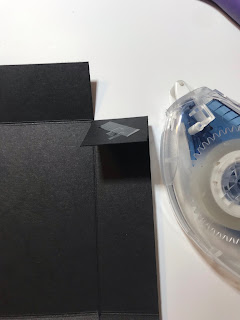
Use your bone folder to make sharp creases at your score lines.  Now add adhesive using your Stampin' Seal + only in the spots as shown below.  Adhere it to form a box shape.


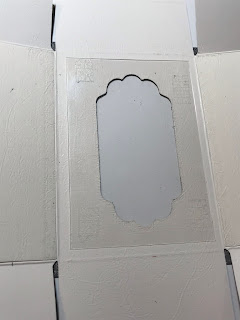
So there it is.... you can stop there and put your tombstone top on.... but what fun would that be???  Let's add a window to the tombstone top!!

You must do this BEFORE you remove the adhesive strips (already on the tombstones) and create your top box.  If you already put all yours together???  Just order more from me! The link will be at the bottom.  You're welcome.

Take your still flat tombstone.  I used the smaller label die from the Seasonal Label Dies (2021 Jul-Dec catalog). **Make sure that you have the label die down below the top crease of the box. Follow the imaginary line from the crease in the flap. Be below that line!! It was too high in this photo.


          Did you see in the photo above that I was not below the crease???? Do as I say, not as I do.

Oh well, we go on.

Cut window sheet to 2¼" x 3¼".  Adhere to the inside of your tombstone.


Now remove the 3m strips that Stampin' Up! so conveniently provided and fold it up!


Now is the best part, decorate it!  I used everything from leftover Paper Pumpkin pieces from 2020 to skeleton stamps from Paper Pumpkin in 2019. Don't forget that adorable gingham black and white ribbon (2021 Jul-Dec catalog).  Did you know that you can color that ribbon with your Stampin' Blends.  Again, you're welcome.

Oops, almost forgot.  Don't throw away the piece you cut out with the label die.  If you cut it in half and add some black ink around it with a blending brush, it makes a great tombstone for decorating.

Let's get you hooked up with everything you need to make these adorable boxes.  Just think, if you can get 16 treat boxes out of it instead of 8, you can treat more co-workers, family members and neighborhood kids for just $10.

Click here to shop with me for the basics needed to make these spooktacular treat boxes!
Counting Sheep - Thank Ewe!


Get this customer appreciation card for FREE when using my current host code.
When you purchase $50 or more, you can get FREE Sale-a-bration items (like Counting Sheep) until 9/30/2021 or while supplies last. 


Thank you for joining us for our Stampin' Up!® Demonstrator Training Program Monthly Blog Hop! We are so happy that you could join us today for this blog hop for ideas and creative inspiration. We are a group of Stampin' Up!® Demonstrators from around the world that are taking part in training that is helping us to build a successful Stampin' Up!® business and reach some goals we have set. We really appreciate your support.  You may be starting here or have come from another blog - either way you can find the link list at the bottom of this post so that you can see every blog post and idea today. Happy hopping!!


I think I have been doing a lot of counting sheep lately because the Counting Sheep stampset and dies have been my favorite Sale-a-bration freebie to play with this week. Needing a customer appreciation card for September, a "thank ewe" card would surely fit the bill!

So, let's make this card!!!

Inks:
Garden Green
Smoky Slate

Stampsets and Dies:
Counting Sheep stamps and dies (*Sale-a-bration) 
Playful Alphabet dies

Cardstock and DSP:
Mossy Meadow
So Saffron
Balmy Blue
Beautifully Penned DSP (*Sale-a-bration) 
Early Espresso

Instructions:
  • Cut cardstock:
            Mossy Meadow 5½ x 8½- fold in half for cardbase (landscape)
            So Saffron 5¼ x 4
            DSP 5¼ x 1½ 
            Balmy Blue 3¼ x 3¾
  • Die cut the fence from Early Espresso.
  • Die cut the letters from Mossy Meadow.
  • Stamp the sheep in Smoky Slate and die cut.
  • Emboss the sheep using the Hammered Metal folder. (I left his face stick out the side of the folder so it wasn't embossed.)

  • Color the sheep with Stampin' Blends- Ivory and Gray Granite.
  • Stamp the grass with Garden Green.
  • All pieces were adhered using glue except the sheep which was adhered with dimensionals.
  • Add some bling using colored rhinestones.

*During Sale-a-bration (until 9/30/2021 or while supplies last), you can get the Counting Sheep stampset, the Sheep Dies and the Beautifully Penned DSP for free for each $50 that you spend!  
As an added bonus, use my current host code to get this card for FREE!
Click here to SHOP NOW.


/>

Delicate Dahlias


This card is part of an International Blog AND my September card packet to my team members.  
If you like my card, please follow this link to place your vote (for me, pretty please). If I finish in the top 10, then I get to participate in a special blog hop with the other finalists!


Get this card packet with the tutorial for free!
(contains cardstock, vellum, dsp, ribbon, and gold leaf)

 
The Delicate Dahlias stampset is FREE during Sale-a-bration (ending 9/30/2021) or while supplies last.  Dahlias are so beautiful on their own, but when you add in my favorite colors (Blackberry Bliss and Pear Pizzazz) it is even better.  As if that wasn't enough, add some gold leafing and the faux alcohol ink designer series paper and it takes it to a whole new level!

Get the card packet, pdf tutorial, and a bundle for FREE!
My team members are getting this card packet and the pdf tutorial for free in September.  Join my Stampin' Up!® team before 9/30/2021 and get all of this:
  • Pick $125 worth of Stampin' Up!® product and you will pay just $99 - no shipping cost on this order!
  • Enjoy a discount of at least 20% for as long as you are a demonstrator.
  • During Sale-a-bration, you also get a FREE BUNDLE (the stamps and dies)!!!!!
    • Choose from Frosted Gingerbread, Christmas Season, Christmas to Remember, Whimsical Trees, Peaceful Deer, Peaceful Cabin, Sweet Little Stockings, Penguin Place, Arctic Bears, Beauty of Tomorrow, Gorgeous Leaves or Nature's Harvest.
  • Join an amazing group of stampers that share ideas and support each other. 
  • While you have the opportunity to sell Stampin' Up!® and earn extra product, income and trips, many join for the discount and become "hobby" demonstrators.  There is nothing wrong with that!!! Take advantage of the discounts and freebies by joining during Sale-a-bration!!!
  • Oh, and you will also get my card packet and the pdf tutorial.... seems so little after all the other goodies, right?
CLICK HERE TO JOIN

If you have any questions about joining, feel free to email me at cardzenbyjen@yahoo.com or call me! I'd love to chat!