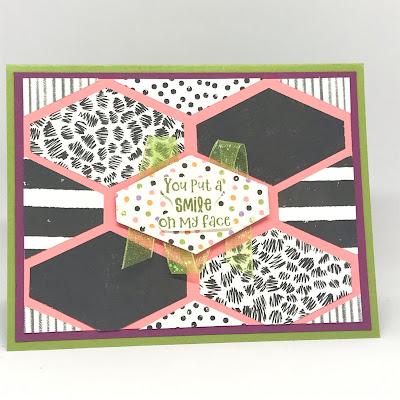
On To the B Sides!!!


This blog is part of a demonstrator training blog hop.  When you are done taking a look at my blog, hop on to the next blog from the list below.  That blog will have the same list at the bottom, and you will just hop on along to the next blog on the list.  That is so much better than googling the night away!!  All this talent in one quick and easy list! 


Welcome to Card Zen by Jen!  This is my December/January Customer Appreciation card.  What does that mean??  Place an order using my current host code, 3W9J72PD, and you will get this card mailed to you for your personal use. Tried something a bit different for this card.... I used the B sides.  I have always been a lover of the B sides.  It all started with Queen's "Another One Bites the Dust."  Can you believe it was on the B side?? Never underestimate them. 

So, here we are in December... about to close out the June-Dec catalog and I have loads of the Cute Halloween paper left as well as the Cutest Halloween stampset.  Oh what is a girl to do???  Let's use some B sides.

Here are the A sides and B sides of this paper and the stampset. At a glance, it seems like you can only use this for Halloween, but let's think outside the box a little.


Using the Taylored Tag, I cut the shapes from the B sides.


Cut Flirty Flamingo cardstock to 3¾" x 5".

I started with the paper using the colored dots in the center and added the black and white shapes around it. Your shapes will go off the cardstock.

*** I put the center image down with TEMPORARY ADHESIVE while I worked out my design. I then adhered the black and white shapes with permanent adhesive.  Don't permanently adhere the colored center shape just yet.


Turn it over and cut around the cardstock.


Center it onto Rich Razzleberry cardstock measuring 4" x 5¼".

Did you know that we have Granny Green glittered organdy ribbon??  Well, we actually have white, but all you have to do is color it with a Stampin' Blend.  You can do this will all the white ribbons that Stampin' Up! sells. (Talk about the ultimate B side!)
So, you guessed it, color your ribbon!!!

Remove the center shape from your card, add some dimensionsals and wrap your ribbon behind it. 

Stamp the "You put a smile on my face" in Old Olive on Basic White cardstock.  Fussy cut it out. Add it to the center of your center shape using a dimensional. 
Adhere it to Old Olive cardstock (Gray Granite works well also.)


I hope that this really does put a smile on your face.  Take a look around your current supplies and see if they don't have some B sides that are still useful.

Don't forget to place your order using my current host code to get this card for free!


1. Kylie Bertucci - Australia  
2. S. Kelli McConkey - InkyHandsWarmHearts - USA  
3. Beth McCullough - Stamping Mom - USA  
4. Sara Sayers - KISS Kreative (UK)  
5. Mo Rootes (UK)  
6. Angie McKenzie - USA  
7. Jessica Hart - Australia  
8. Mary Ann Curtis - USA  
9. Trish Soliman - Australia  
10. Janelle Duggan - Australia  
11. Angela Meiritz-Reid  
12. Diane Evans - Stampin With Diane (Canada)  
13. Melva Peters - Stamping With Melva (Canada)  
14. Rebecca Nutley  
15. Virginia Hodgins - Canada  
16. Vicky Wright - Australia  
17. Cheryl Hurst - Australia  
18. Sandie Brain -UK  
19. Karen Gilbert - Canada  
20. Laurie Bradshaw USA  
21. Lesley Seabrook Canada  
22. Melissa Faust - Stamp with Melissa - USA  
23. Shelly Wadge - Australia  
24. Leonie François - Prulleke - the Netherlands  
25. Liz Yuille - Old Stables Crafts - UK  
26. Robbie Rubala - USA  
27. Theresa McEntee-Theresa's Treasures- USA  
28. Sue Sanders - USA  
29. Jan Bassett  
30. Cindy-lou Kyle-Canada  
31. Denise Cox - Birdsnest Designs - Canada  
32. Candace Birch, Knotty Birch Studios, Idaho, USA  
33. Jenna Moore - Jenna's Crafting Studio (Canada)  
34. Tracy held - Trace Of Creativity, Australia  
35. Jennifer Blaschak- Card Zen by Jen (USA)  
36. Janice Piechowiak - USA  
37. Kelly Taranto - The Late Night Stamper (USA)  
38. Christy Gridley - Christy's Stamping Spot - USA  
39. Laurie Bellard - USA  
40. Mandy Witherby - Australia  
41. Bonnie Sanche - Canada  
42. Verna Mullen - StampinNotes - USA  
43. Teah Woodward  
44. Heather Guerrero - USA  
45. Lorraine Tierney ChatnCraft with Lorraine USA  
46. Cheryl Hamilton  
47. Judith Patterson ~ USA  
48. Suzie Jewell - USA  
49. Rose Coleman- Canada  
50. Heidi Collins, On Y Go! Stamping - USA  
51. Anne Marie Jakubiec-Canada  
52. Tamara Semon - USA  
53. Kate Bolt  
54. Theresa Hayes-USA  
55. Kathi Ondus - USA  
56. Rachel Aziamadi - Scrapinium - France / Germany  
57. Creating Art With Marilyn  
58. Rookaya Parak - Canada  
59. Maheswari Rajaguru - Australia  
60. Ann Alexander - Bellestampin with Ann - Australia  
61. Teresa Brown Australia  

(Linkup closed)

10 comments:

  1. Great use of that punch Jen. Love it.

    ReplyDelete
  2. What a great idea. I love making cards using that punch!

    ReplyDelete
  3. Such a great way to use up left over DSP, thank you for sharing.
    Christina Barnes

    ReplyDelete
  4. Punch art to make a great card. Thanks for sharing

    ReplyDelete
  5. Love your idea using a punch to make a card

    ReplyDelete
  6. Loving this 'B side' card! Thank you Jennifer for taking part in our Demonstrator Training Blog Hop this month.

    ReplyDelete
  7. Love these cards. Brilliant use of the punch and B sides. Thanks for sharing

    ReplyDelete
  8. I love letting DSP do all the work, and this design shows it off beautifully.

    ReplyDelete
  9. Lovely cards Jen, also a great way to use up scraps.

    ReplyDelete

Being a beginner blogger, I would love your feedback!